This video gives a brief introduction to PowerShell. It provides a (hopefully) valuable set of advices and commands that can be used by every developers while performing their day 2 day development activities on windows with PowerShell.
I’m currently following the Pluralsight training Full Stack Node.js. The course was release more than a year ago and it is based on express.js 2.x. I have chosen to build the course sample on express 3.x and because of this some features described on the course are no more applicable. The purpose of this blog post is to actually demonstrate how to migrate properly one of the them: “The Flashing”.
Simply put, the flashing consist of displaying a status message once an operation executed on a post has completed. The Flashing is particularly useful when using the Post/Redirect/Get Pattern. The all scenario can be described as:
The user submit a form with a POST action
The user form is process and a result status is generated such as “Error” or “Success”
The Post action completes with a redirect that will tell the client browser to GET another page.
The rendering of the get result should display the processing status
I found several questions on stackexchange explaining how to do that but none of them was clear enough for me to understand… So I digged a bit and I decide to share my findings here.
Fine… How am I suppose to do that? Well I believe the answer is incomplete.
You will use the middleware to add processing into the handling of your request and its response. After all this is why the middleware is there for. Then in the middleware you will attach a function that can be used in the route handler. This function will use res.locals to attach something to your response that can be used on the rendering of the view. This is incomplete… or at least this how I understood it and it felt incomplete.
Our problem here is that we are using the Post/Redirect/Pattern and this means that all data attach to the res.locals vanish as soon as you do a redirect. The redirect will instruct the browser to perform a GET and this will start the request from the processing of the HTTP request from the beginning. There is no way to solve our issue just with a middleware and res.locals!!! We need a way to pass information from the POST and REDIRECT to the following GET. The only to do this is via a cookie or in the session. But those will then need to be cleaned once the status message has been displayed.
This is how I have achieved this. First I have implemented the middleware and it looks like this:
1
2
3
4
5
6
7
8
9
10
11
12
13
14
15
16
17
18
19
20
21
22
23
24
25
26
27
28
29
30
31
32
33
34
35
36
"use strict";
var currentRes;
var currentReq;
module.exports = function(){
returnfunction(req, res, next) {
//We save the response and request reference has we will need it later
currentRes = res;
currentReq = req;
//We attach the flash function to be used from the route handler
req.flash = _flash;
//We read the status from the session if it is there and we remove it
_flash();
next();
};
};
var _flash = function(type,message){
//We need a session if there is none... Then we raise an exception
if (currentReq.session === undefined) {
throwError('req.flash() requires sessions');
}
//This the usage from the route handler. This will store the status message in the POST processing
I had recently a discussion with a younger developper in C# that was asking question about the usage of the yield keyword. He was saying he never used and though it was useless. He then confessed me it didn’t really understood wath the keyword was exactly about. I tryed to explain him what it does and this the material I would have used it if I had it at that time. I will try with this post to explain what “yield” is all about with simple but concrete examples.
First thing first. Where can we use it?
It should be used in a function that returns an instance that implement IEnumerable or and IEnumerable<> interfaces. The function must return explicitely one onf those interfaces like the two following functions:
1
2
3
4
5
6
7
8
9
10
11
12
13
14
public IEnumerable GetIntegers1()
{
yieldreturn1;
yieldreturn2;
yieldreturn3;
}
public IEnumerable<int> GetIntegers2()
{
yieldreturn1;
yieldreturn2;
yieldreturn3;
}
By returning the IEnumerable interfaces those functions become iteratable and can now be used directly from the foreach loop like:
1
2
3
4
5
6
7
8
9
10
foreach (var i inGetIntegers1())
{
Console.WriteLine(i.ToString());
}
foreach (int i inGetIntegers2())
{
Console.WriteLine(i.ToString());
}
Ok but why using it?
What is the difference between those two functions and this one?
1
2
3
4
5
public IEnumerable GetIntegers1()
{
returnnew List{1,2,3}
}
It might not be obvious at first sight as the result is identical but the execution flow is different. Basically if you debug the program execution you will see the following for the returned list
Enter the foreach loop
Call the GetIntegers ONCE
Write the first number
Write the second number
Write the third line
And you will see the following when using the yield return
Enter the foreach loop
Call the GetIntegers but leave at the first return
Write the first number
Call the GetIntegers but start at the second return and leave just after
Write the second number
Call the GetIntegers but start at the third return and leave just after
Write the third line
That is all. It simply changes the execution flow and allow you to handle each element of the list one by one before the next element is called.
Fantastic! but is this magic?
No it is not. You could have achieve the same result by having implemented yourself the iterator pattern using the interface IEnumerable and IEnumerator and building a dedicated class to handle this like the following code (for simplicity I will only implement IEnumerable but IEnumerable<> could have been implemented as well):
1
2
3
4
5
6
7
8
9
10
11
12
13
14
15
16
17
18
19
20
21
22
23
24
25
26
27
28
29
30
31
32
33
34
35
36
37
38
39
40
41
42
43
44
45
46
public class IterableList : IEnumerable, IEnumerator
{
public List numbers;
public int index;
public IterableList()
{
numbers = new List();
int index = 0;
}
public IterableList(IEnumerable inputlist): this()
{
foreach (var i in inputlist)
numbers.Add(i);
}
public IEnumerator GetEnumerator()
{
return this;
}
public bool MoveNext()
{
index++;
if (index > numbers.Count)
return false;
return true;
}
public void Reset()
{
index = 0;
}
public object Current
{
get
{
if (index == 0)
return 0;
return numbers[index - 1];
}
}
}
And then define a function:
1
2
3
4
5
publicstatic IterableList GetIntegers3()
{
returnnew IterableList(new List{1,2,3});
}
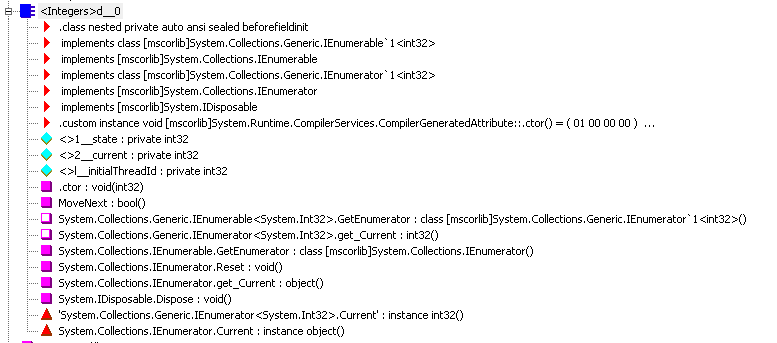
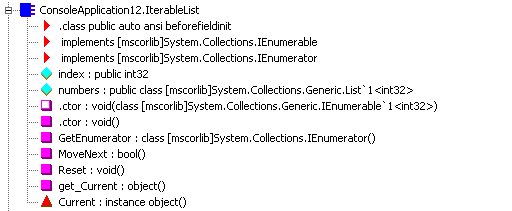
Both of the code generated by the compiler will look very similar. This can be confirmed by looking at the IL code generated by both of our implementation. We can see that when using yield an extra class is generated for us that implements IEnumerable and IEnumerator (and their generic version).
The Iterable class we have written will look mostly the same (But for the generic versions that we have not implemented)
To summarize!
Basically using the yield will allow us to have the control over the way the items in our IEnumerable result items and their processing happens. And no magic behind. It is simply an helper that will generate the code for you.
In one of my assignment I had to investigate different ways to publish utility libraries to different projects and development team. The first idea that came to my mind was to build a Nuget package and to configure an internal Nuget Feed where I could publish my package. This sound like a good idea and I was going to close the analysis phase and settle down for the implementation when someone came to me and asked a question about how I was going to manage the Security patch deployment. Let me clarify what is a security patch.
A Security patch is a patch that needs to be deploy to production no matter of the risk for the production application to gets into trouble. It is a patch that does not contain any API or interface change but contains only internal corrections. Those patch are not deployed in the scope of a particular application but are deployed on any machine a specific component is used. In my situation, as I’m only delivering Libraries, I need to be able to tell to the ops team “Please deploy this on all machine the library is in use”. And this is my major problem. I don’t know. My library get used through Nuget and only the client applications know the package they are using. I also cannot guarantee that a fix on one package with the publication of a new Nuget package version will be picked up right away by the client application development team and included in their next deployment.
What option do I have here? Nuget package do not cover this scenario by design. My first reaction was to challenge the requirement? What kind of library might require a security patch? Not so many. You know what they say: “Show me a dragon and then I will show you excalibur”. This did not convince. I had to find a specific way to deploy those security sensible libraries.
This when I started investigating GAC deployment. How do I achieve GAC deployment? Well I build my library and I make it available through an MSI. This MSI will register that library in the GAC. The MSI being deploy on machine as a unit of deployment, it can be tracked and inventoried by the OPS team. I can find the list of machine where I will have to deploy my security patch.
The GAC deployment provides me with the possibility to deploy a new version version of a library on a machine and make sure any client application using the old version of the component will pick up the new version right away. I tested this and this is how I achieved this:
I wrote two libraries with the following code:
Version 1.0.0.0
1
2
3
4
5
6
7
8
9
10
11
12
13
14
15
using System.IO;
namespaceCommonLibrary
{
publicclassLibrary
{
publicvoidFunction()
{
var file = new StreamWriter("D:\\VersionLog.txt",true);
file.WriteLine("This is version 1.0.0.0 of the library's function");
file.Close();
}
}
}
Version 2.0.0.0
1
2
3
4
5
6
7
8
9
10
11
12
13
14
15
using System.IO;
namespaceCommonLibrary
{
publicclassLibrary
{
publicvoidFunction()
{
var file = new StreamWriter("D:\\VersionLog.txt",true);
file.WriteLine("This is version 2.0.0.0 of the library's function");
file.Close();
}
}
}
Both of them where compiled and strongly signed with the same key.
I wrote a small client app that was using the library It looked like that:
1
2
3
4
5
6
7
8
9
10
11
12
namespaceClientApplication
{
classProgram
{
staticvoidMain(string[] args)
{
var lib = new Library();
lib.Function();
}
}
}
I built those components on .NET framework 4.5 meaning I’m using the GAC of the .NET framework 4.0.
I deploy the version 1.0.0.0 to the GAC using the following .NET framework 4.0 gacutil command from a visual studio 2012 command dos prompt:
1
2
gacutil /i CommonLibrary.dll
I could then use the following command to check the proper installation of my component in the GAC
1
2
gacutil /l CommonLibrary
And the result was:
1
2
3
4
5
6
7
8
Microsoft (R) .NET Global Assembly Cache Utility. Version 4.0.30319.17929
Copyright (c) Microsoft Corporation. All rights reserved.
The Global Assembly Cache contains the following assemblies:
Then I ran the client application application exe file and I could check in my output file the following line
1
2
This is version 1.0.0.0 of the library's function
Then I deployed the version 2.0.0.0 of the library using the same method as previously mentioned. I then run the the following command to check the content of my GAC
This clearly shown the multiple version of my deployed library. After running the client application I could see my client application was still using the version 1.0.0.0. In order for my client application to use the version 2.0.0.0 of the library I have to deploy a policy file. A policy file is a config file (XML) that gets compiled into a dll in order to be deployed to the gac. This will tell the GAC to redirect all calls for a given version to a another version.
This is the content of my policy config file that I named RedirectPolicyFile.config.